|
||||||||||||||||||||||||||||||||||||||||||
|
||||||||||||||||||||||||||||||||||||||||||

Manage long exposure with CMOS sensors
A cost-saving solution from iDS
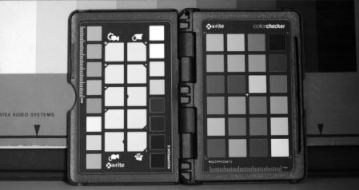
Capturing an image in low light conditions usually means working with
high gain in order to obtain sufficient detail from the image. The trade-off
is that using high gain causes more image noise (see Fig. 1)
which, in turn, produces a lower quality image. CMOS sensors which
offer a long exposure are a cost-saving alternative to CCD sensors
and can be used a wide range of application areas.
The solution to capturing in low light is to use long exposure which allows
the taking of high-quality images with low noise even when lighting conditions
are poor. (See Fig 2)
An exposure of several seconds is referred to as long exposure. Some iDS
uEye models with CMOS sensors allow a long exposure, for example up to
10 seconds offering
an interesting and cost-saving alternative to CCD sensors
 |
 |
|
| Fig. 1 Capture without long exposure | Fig. 2 Capture with long exposure at 1 Lux with 10 seconds and double gain |
Capturing with long exposure
using uEye
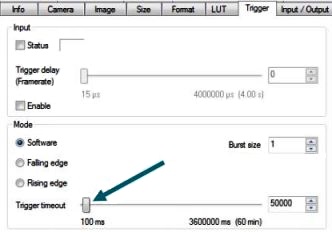
Rather than operating in free mode, trigger mode should be used with single
shots.
A software trigger can be fired in uEye Cockpit using the ![]() button in the tool bar. As well, the timeout must be adjusted for long
exposure to avoid wrong messages by setting the timeout trigger via the
“Properties” dialogue in uEye Cockpit. (See Fig. 3).
button in the tool bar. As well, the timeout must be adjusted for long
exposure to avoid wrong messages by setting the timeout trigger via the
“Properties” dialogue in uEye Cockpit. (See Fig. 3).
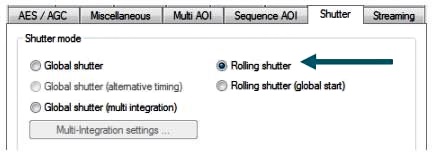
Use of the rolling shutter mode is also recommended if this mode is supported
by the camera. The rolling shutter mode is activated in the "Shutter"
tab in uEye Cockpit.
 |
 |
|
| Fig. 3 Increasing the timeout in uEye Cockpit | Fig. 4 Activating the rolling shutter mode in uEye Cockpit |
The pixel clock (see Fig. 5) now needs to be set at minimum value (1) in the “Camera” tab and the “Long-term” option (2) activated the result being that the largest possible exposure time increases to the maximum long exposure time (3), in this example up to 10 seconds. This method can also be used for cameras that do not support long exposure by setting the pixel clock and frame rate to the minimum values to achieve the maximum exposure value).
 |
Application
areas |
||||
| The long exposure is ideal for all applications where capture
is conducted under low-light conditions. |
|||||
| •
|
Microscopy Fluorescence analysis Medical technology Quality assurance Mechanical engineering Astronomy |
||||
| uEye camera models that support long exposure | |||||
| USB
2.0 |
USB 3.0 | GigE | |||
| UI-1250LE | UI-3250CP | UI-5250CP | |||
| UI-1251LE | UI-3250LE | UI-5251LE | |||
| UI-1252LE | UI-3251LE | UI-5252LE | |||
| UI-1250ML | UI-3252LE | UI-5254LE | |||
| UI-1250SE | UI-3250ML | UI-5250RE | |||
| UI-5250RE PoE | |||||
| UI-5250SE | |||||
| Fig. 5 Configuring long exposure in uEye Cockpit | |||||
Acknowledgement: The above is an adaptation of an article published by iDS
|
If you like this page, please recommend it and share it. |
||
| More | ||